Rustfolio 🦀
Rustfolio Repo @ https://github.com/athletedecoded/rustfolio
Rust x MLOps Repo @ https://github.com/athletedecoded/rust-mlops
To use this mdbook template
Fork/clone from Github Repo
https://github.com/athletedecoded/rustfolio
Install mdbook
$ make install
Sync Project README
- Copy the project template to create new project
./src/my-project.md - Add project link to
./src/SUMMARY.md - In
my-project.mduncomment**Project Repo:**and update to project repo url
To sync my-project.md with README content in the project repo run:
$ make sync
This will also fetch referenced ./assets/ images and download to local Rustfolio ./src/assets/ folder
Preview mdbook
$ make serve
Deploy to Github Pages
Automatic CI/CD via Github Actions on git push. See .github/workflows/deploy.yml
Note: this will automatically sync project README using make sync
$ git push origin main
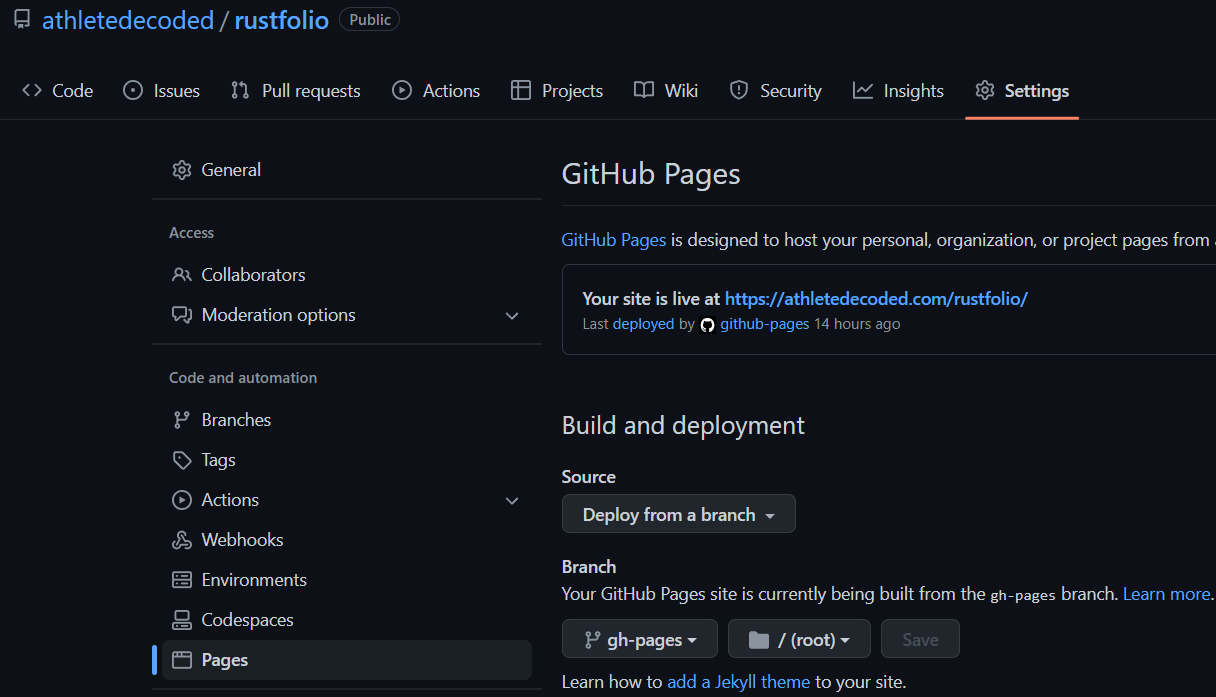
Configure Repo for Github Pages
Ensure repository is serving from gh-pages branch
References
- mdBook Official Docs
- mdBook Automated Deployment with Github Actions
- peaceiris Github Actions for mdBook
Credits: athletedecoded
Project Repo: https://github.com/athletedecoded/rust-s3-cli
![]()
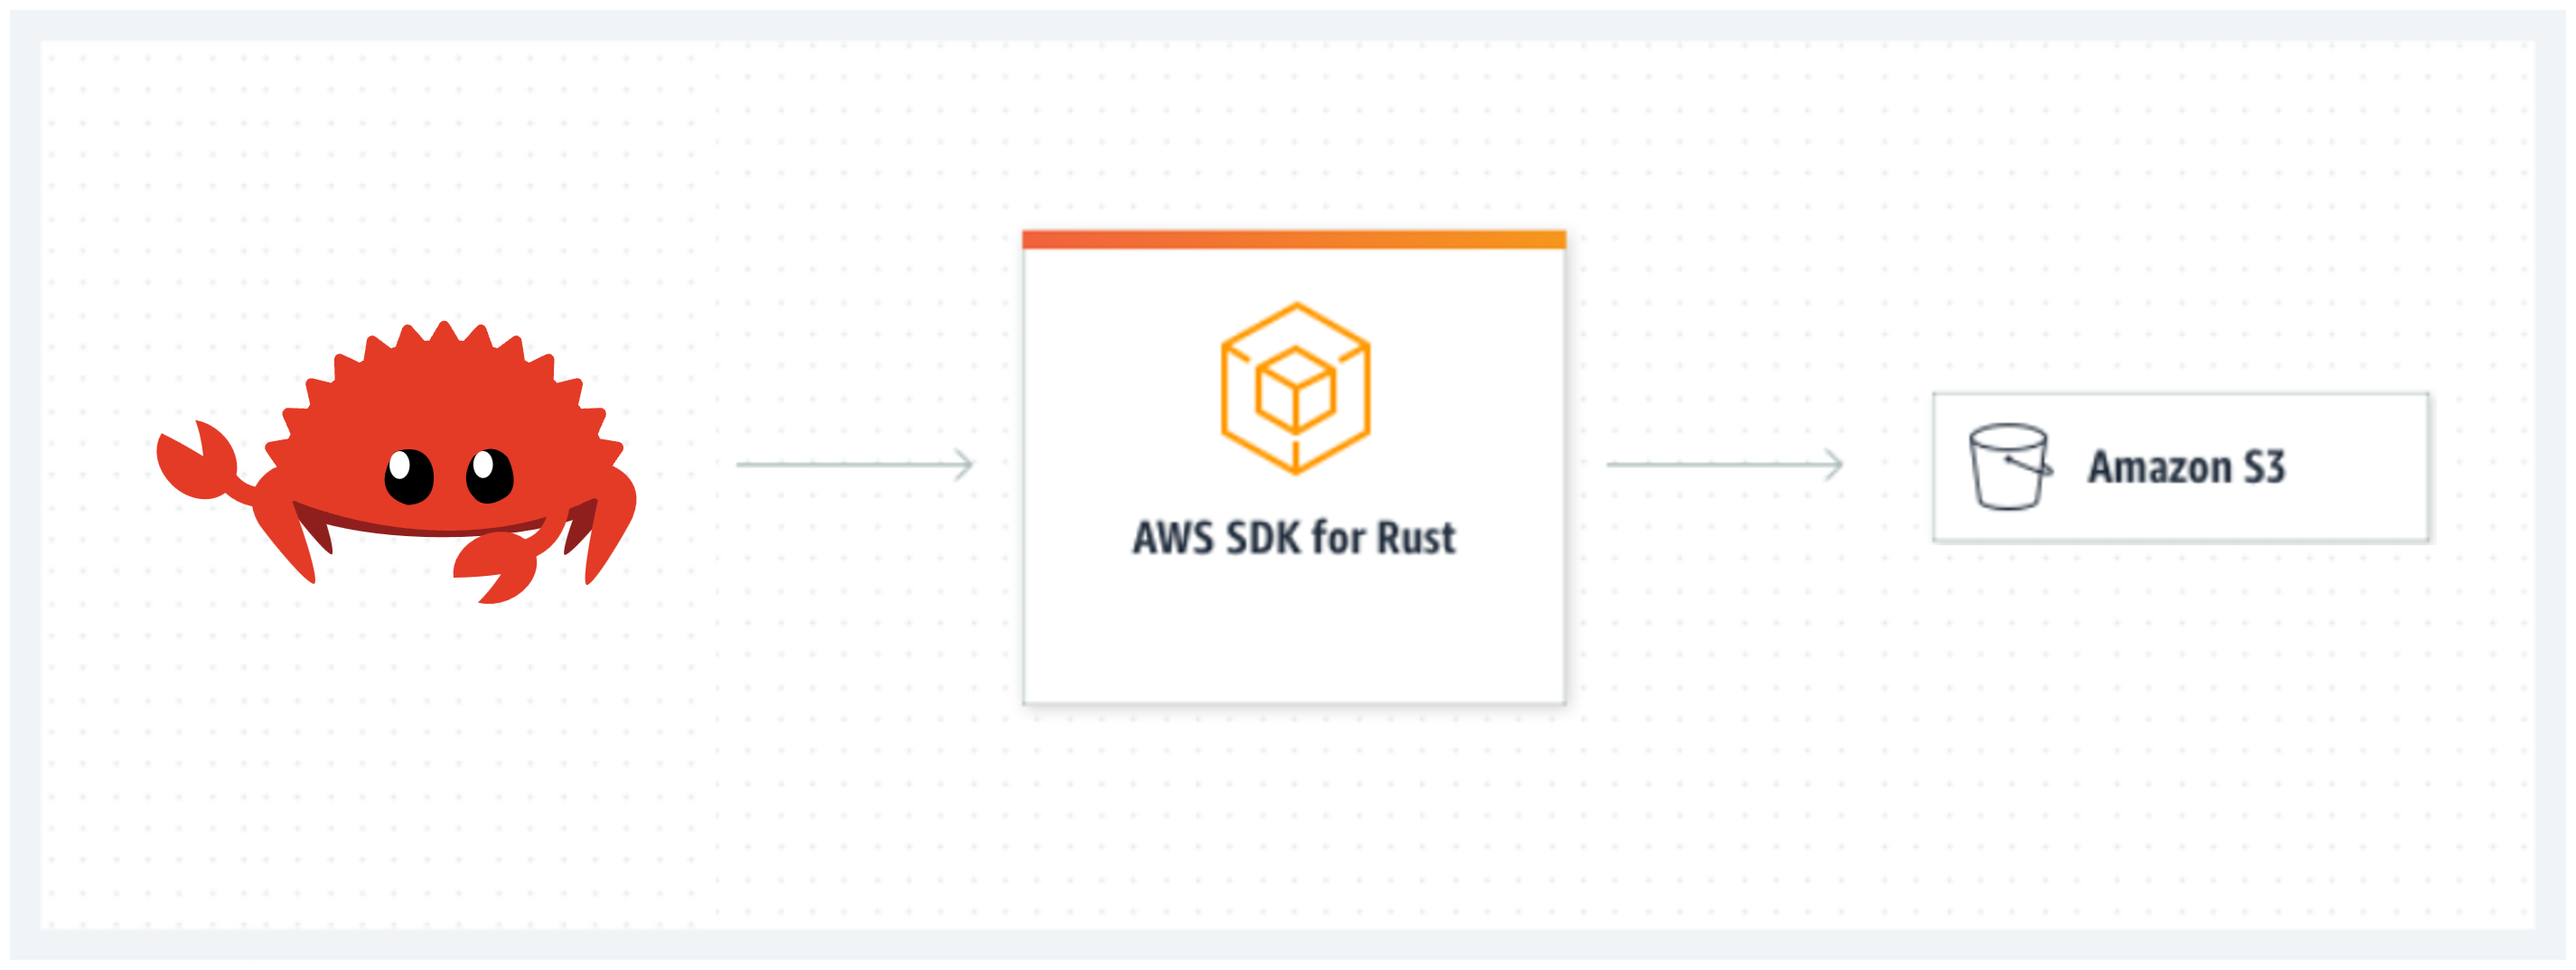
AWS S3 Rust CLI Tool
The current AWS CLI is written in Python. For this project I have built a mini AWS S3 CLI using Rust which supports CRUD operations for buckets and objects.
Project Goals/Outcomes
- Develop my first Rust project
- Use Github Codespaces and Copilot
- Integrate the 'AWS SDK for Rust' into a Rust project
Setup
-
Create an AWS IAM User Policy for S3
-
Configure your ~/.aws/credentials file with environment variables:
aws_access_key_id,aws_secret_access_keyandregion
Useage
List all S3 buckets
$ cargo run list
List all objects in a specified S3 bucket
$ cargo run list --bucket <bucket_name>
# ex: cargo run list --bucket ids721
Create new S3 bucket
$ cargo run create --bucket <bucket_name>
# ex: cargo run create --bucket ids721
Upload an object to an S3 bucket
NB: Will create bucket if DNE
$ cargo run upload --bucket <bucket_name> --filepath <path_to_file>
# ex: cargo run upload --bucket ids721 --filepath ./test/test.png
Delete an object from an S3 bucket
$ cargo run delete --bucket <bucket_name> --key <object_key>
# ex: cargo run delete --bucket ids721 --key test.png
Delete an empty S3 bucket
$ cargo run delete --bucket <bucket_name>
# ex: cargo run delete --bucket ids721
Get an object from an S3 bucket
$ cargo run get --bucket <bucket_name> --key <object_key>
# ex: cargo run get --bucket ids721 --key test.jpg
CI/CD
Github Actions configured in .github/workflows/rust.yml
Build Executable
$ make release
Progress Log
- Create an AWS IAM User Policy for S3
- Configure Github Codespaces with AWS Toolkit Credential Profile
- Initialise Rust project with AWS SDK for Rust
- Establish basic AWS client connection to list S3 buckets
- Add clap command line parsing for arguments (bucket name, local file name)
- Bucket fxns: list, create new, check if exists, delete if empty
- Object fxns: list objects in bucket, upload to existing bucket, upload to new bucket, delete
- CI/CD with Github Actions
References
- AWS SDK for Rust
- AWS Toolkit Credential Profile
- AWS Credentials for VS Code
- AWS IAM User Policy for S3
Project Repo: https://github.com/athletedecoded/img-compress
![]()
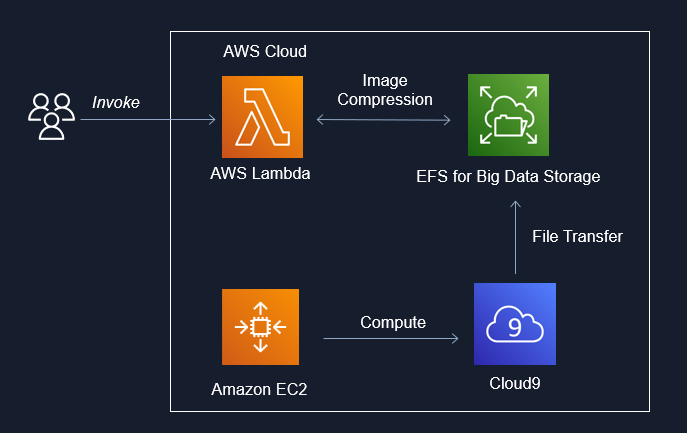
IDS721 Spring 2023 Project 4 - Image Compression for Big Data
Image Compression for Big Data using EFS x Lambda x Rust. Uses downsampling + filter to perform inplace image compression in parallel and reduce the memory cost of big image data storage. Includes upsampling invocation option to restore image size.
Useage
cargo lambda invoke --remote \
    --data-ascii '{"dir": "imgs", "scale_op": "down", "scale_factor": 2, "filter": "Gaussian"}' \
    --output-format json \
    img-comp
where:
- dir = subdirectory to perform compression on i.e. /mnt/efs/{dir}
- scale_op = "down","up"
- scale_factor = factor to scale width/height
- filter = "gaussian" (default), "nearest", "triangle", "catmullrom", "lanczos3"
Developer Setup
Configure AWS IAM Permissions
- Create an IAM User policy for "LambdaDev" with
AWSLambda_FullAccesspermissions and added custom inline permission config
{
    "Version": "2012-10-17",
    "Statement": [
        {
            "Sid": "PermissionsToDeploy",
            "Effect": "Allow",
            "Action": [
                "iam:CreateRole",
                "iam:CreatePolicy",
                "iam:PutRolePolicy",
                "iam:AttachRolePolicy",
                "iam:UpdateAssumeRolePolicy"
            ],
            "Resource": "*"
        }
    ]
}
- Add "LambdaDev" access keys to your local ~/.aws/credentials file along with environment variables:
- aws_access_key_id
- aws_secret_access_key
- aws_role_arn (NB: this is copied from the IAM user summary and is formatted as arn:aws:iam::<aws_acct>:user/<iam_user>)
- region
- Create an IAM Role policy named "EFSxLambda" with
AWSLambdaBasicExecutionRole+AWSLambdaVPCAccessExecutionRole+AmazonElasticFileSystemClientFullAccesspermissions
Deploy Lambda Fxn from Developer Environment (i.e. this repo)
# Install cargo-lambda
$ python3 -m venv ~/.venv
$ source ~/.venv/bin/activate
$ make install

# Build Binary
$ make release

# Deploy to AWS
$ make deploy
Setup Cloud9
- Launch Cloud9 console and create an environment with "New EC2 Instance" + "SSM Connection" + "default VPC"
- Once provisioned, click on env details > EC2 instance > manage EC2 instance. Make note of the associated security group listed.
Setup EFS
- Launch AWS EFS console and provision EFS instance
- Once provisioned, click on file system name > network. Make note of the security group id listed.
- Under EFS access points tab > add access point > create with following settings:
- Name: Lambda2EFS
- Root directory path:
/(by default root is /mnt/efs) - Posix User ID: 1000
- Posix Group ID: 1000
- Owner User ID: 1000
- Owner Group ID: 1000
- Access point permissions: 0777
Configure Security Groups
- From EC2 console > security groups > new security group:
- Name = ImgComp
- Description = Mangage img-comp lambda access
- VPC = same as EFS (default)
- Save
- To enable EFS --> Lambda: click ImgComp security group ID > edit inbound rules > Set: type = NFS, protocol = TCP, port range = 2049, source = custom > add the EFS security group ID (from the drop down box)
- To enable EFS --> Cloud9: click Cloud9 security group ID > edit inbound rules > Set: type = NFS, protocol = TCP, port range = 2049, source = custom > add the EFS security group ID (from the drop down box).
- To enable Lambda & Cloud 9 --> EFS: click EFS security group ID > edit inbound rules > add inbound rule for each:
- Set: type = NFS, protocol = TCP, port range = 2049, source = custom > add the ImgComp security group ID (from the drop down box)
- Set: type = NFS, protocol = TCP, port range = 2049, source = custom > add the Cloud9 security group ID (from the drop down box)
Configure Lambda
- Configuration > Permissions > edit execution role > select "EFSxLambda" from above
- Configuration > VPC > edit > select default VPC (to match EFS)
- Configuration > VPC > edit > select security group as ImgComp
- Configuration > File Systems > add EFS + access point + local mount path = /mnt/efs
- Configuration > Env Variables > LD_LIBRARY_PATH = /mnt/efs
Mount EFS to Cloud9
- Launch Cloud9 environment
- Run the following commands to mount to /mnt/efs
# Docs: https://repost.aws/knowledge-center/efs-mount-automount-unmount-steps

# Install efs-ultils (https://docs.aws.amazon.com/efs/latest/ug/installing-amazon-efs-utils.html)
sudo yum install -y amazon-efs-utils

sudo mkdir -p /mnt/efs

# From img-comp EFS > Attach > copy EFS helper command
sudo mount -t efs -o tls <AWS_FS_ID>:/ /mnt/efs

# Switch ownership permissions
sudo chown ec2-user:ec2-user /mnt/efs
sudo chmod 755 /mnt/efs

# Copy local Cloud9 imgs directory to EFS
cp -r imgs /mnt/efs

# check files have been moved over
cd /mnt/efs
ls
Gotchas
- Invokation failure may be insufficient lambda CPU/tmp storage that needs to be reconfigured for higher capacity
References
Project Repo: https://github.com/athletedecoded/s3-backup
![]()
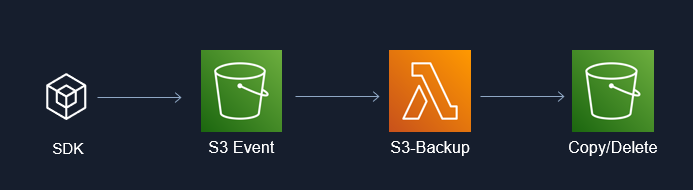
IDS721 Spring 2023 Project 3 - Rust Serverless with AWS
Automated serverless S3 backup using AWS Lambda x Rust
What I Learnt
- Deploying AWS serverless using Lambda x S3 trigger
- Configuring S3 Access Points and Roles
Developer Setup
Pre-Configure AWS
- Create an IAM User policy for "LambdaDeveloper" with
AWSLambda_FullAccesspermissions and added custom inline permission config
{
    "Version": "2012-10-17",
    "Statement": [
        {
            "Sid": "PermissionsToDeploy",
            "Effect": "Allow",
            "Action": [
                "iam:CreateRole",
                "iam:CreatePolicy",
                "iam:PutRolePolicy",
                "iam:AttachRolePolicy",
                "iam:UpdateAssumeRolePolicy"
            ],
            "Resource": "*"
        }
    ]
}
- Add "LambdaDeveloper" keys to your local ~/.aws/credentials file with environment variables:
- aws_access_key_id
- aws_secret_access_key
- aws_role_arn
- region
Note: aws_role_arn is copied from the IAM user summary and is formatted as arn:aws:iam::<aws_acct>:user/<iam_user>
- Create an IAM Role policy for "S3xLambdaAccessRole" with
AmazonS3FullAccessandAWSLambdaBasicExecutionRolepermissions - Allocate 3 x S3 Buckets (SourceBucket, OutputBucket, RubbishBucket) and add an Access Point to each
Deploy Lambda Function
# Install cargo lambda
$ python3 -m venv ~/.venv
$ source ~/.venv/bin/activate
$ make install

# Build binary
$ make release

# Deploy to AWS
$ make deploy
AWS Permissions
- From the AWS Lambda Console > Functions > s3-backup > Configuration > Permissions > change Execution role to preconfigured "S3xLambdaAccessRole"
- From the AWS Lambda Console > Functions > s3-backup > Configuration > Environment variables > set the following env variables coinciding with S3 Access Point ARNs:
SRC_AP_ARN,DEST_AP_ARN,RUBBISH_AP_ARN
NB: Access Point ARNs will be of the format arn:aws:s3:[region]:[aws-id]:accesspoint/[access-point-name]
References
- Cargo Lambda for Rust
- Using the AWS SDK for Rust in AWS Lambda function
- AWS Lambda Events Docs for Rust
- AWS Serverless Rust Demo
- AWS Tutorial: S3 Object Lambda
Project Repo: https://github.com/athletedecoded/hf-micro
![]()
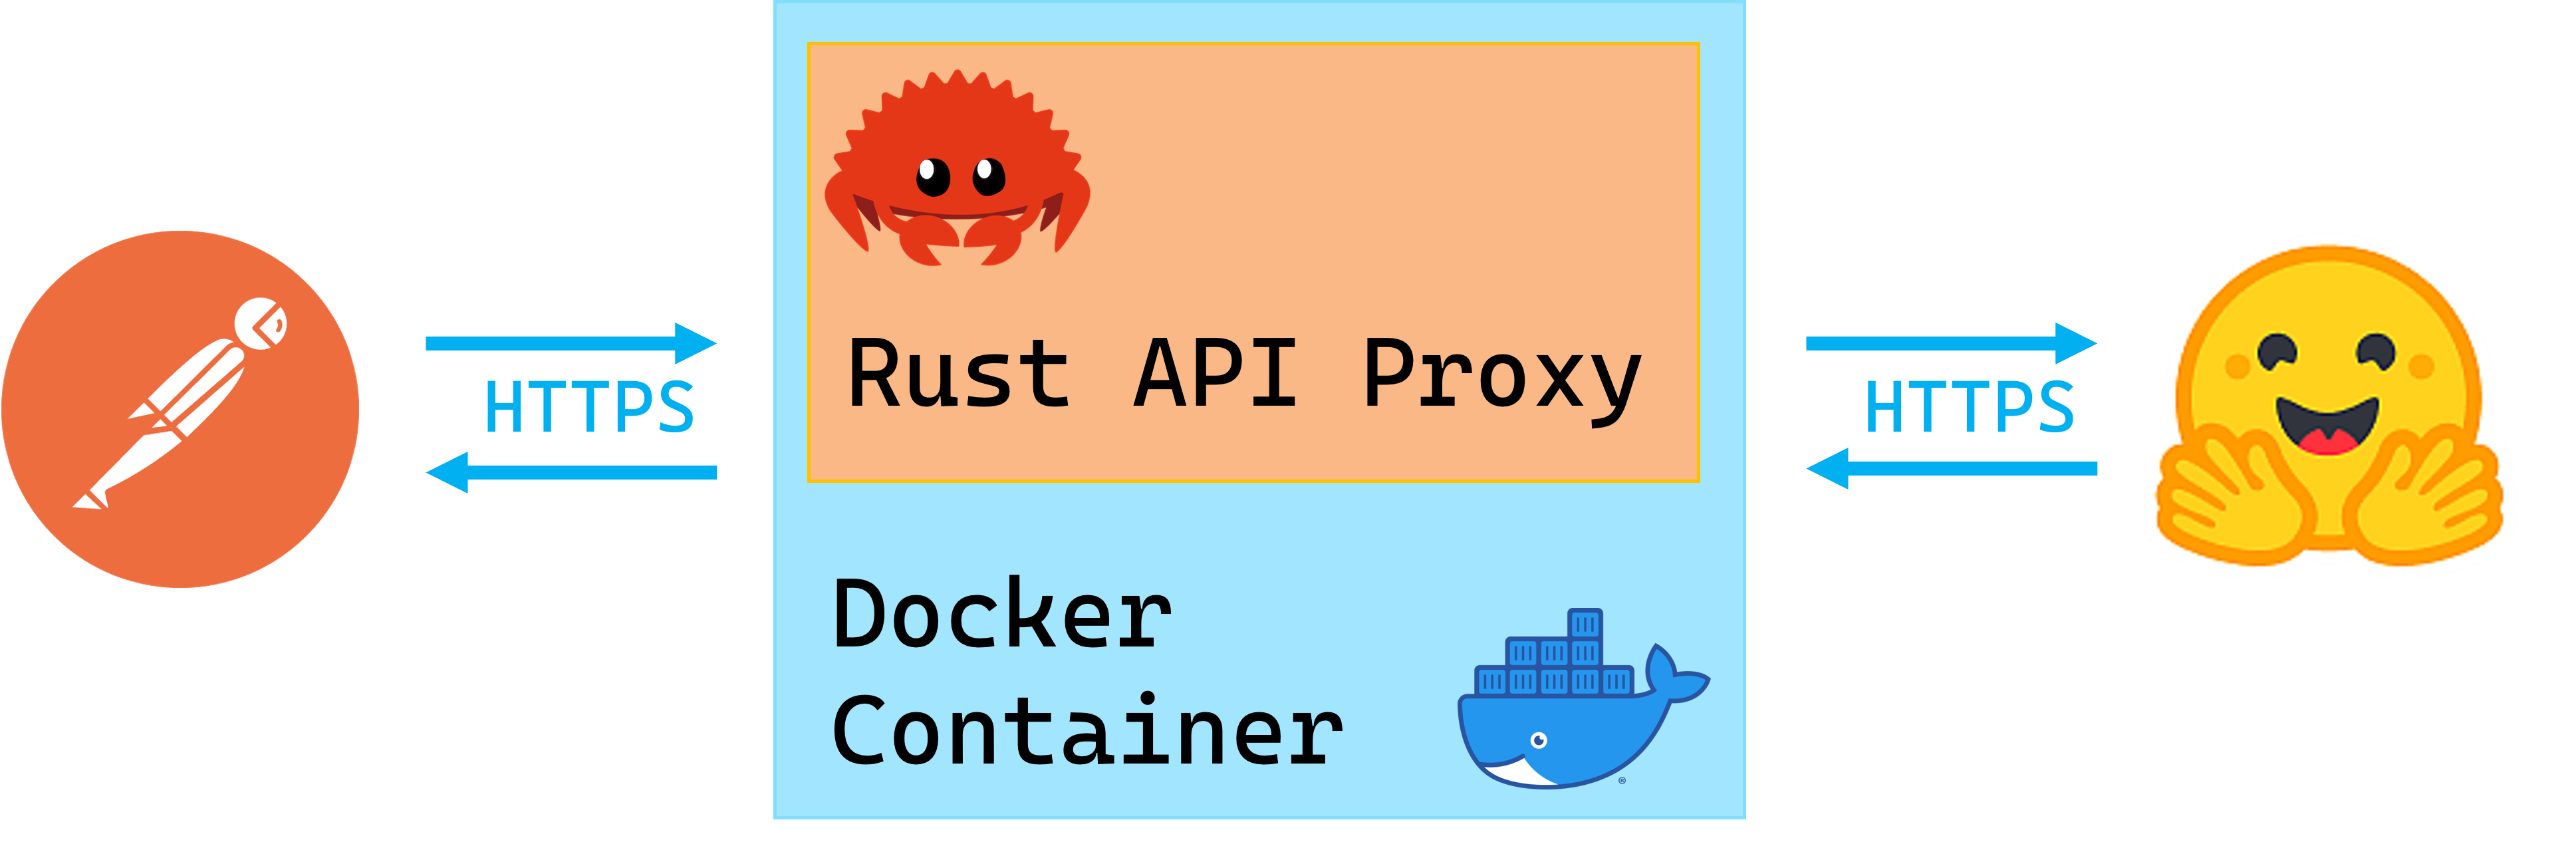
IDS721 Spring 2023 Project 2 - Rust Containerized Microservice
The HuggingFace Hub is implemented as a Python wrapper around the HuggingFace API Endpoints. This project is a distroless and containerized Rust microservice that acts as an API proxy for the HuggingFace API Endpoints. Github Actions allows for automated CI/CD to Azure Containers.
What I Learnt
- Configuring reqwest for GET, POST, PUT, DELETE requests
- Certifying HTTPS using reqwest from within a Docker image -- I spent days debugging and exhausting certification solutions and it all came down to enabling the rustls-tls feature in reqwest and either installing debian ca-certificates or mounting them to Docker at runtime 🤯
- CI/CD with Github Actions to automate Azure container deployment
Setup
Install
$ make install
HuggingFace Access Token
- Generate a HuggingFace personal access token with write permissions
- Configure environment variables below per choice of launching locally or within Docker
To launch locally
- Rename
SAMPLE_ENVto.envand save - Set your HF personal access token in
.env - Run local microservice on localhost:8080
$ make run
To launch within Docker
- Set your HF personal access token in Makefile (line 2)
- Build Docker image
$ make build
Gotchas if you encounter a build failure on "ERROR [internal] load metadata ..." then run
$ rm  ~/.docker/config.json
$ make build
- Run Docker image
$ make rundocker
Docker Debugging CA-Certificates
If you have CA-certification issues you may need to manually mount self-signed certificates to the Docker image instead. To do this first generate .pem certificate
# make local certs dir
$ mkdir ./certs
# generate ca-certificates
$ openssl req -x509 -newkey rsa:4096 -keyout ./certs/key.pem -out ./certs/cert.pem -sha256 -days 365 -nodes -subj '/CN=localhost'
Then launch Docker image with mounted certificates
$ make mntcerts
Deploy to Azure
- Provision an Azure Container App and set repository PAT, AZURE_CREDENTIALS secrets according to this repo docs
- Ensure Container App
ingresssetting matches port "8080" - Set a repository secret
HFATto your HuggingFace Access Token git push origin deploy-distrothen manually trigger workflow from GitHub Actions
Useage & Endpoints
Supported endpoints to base URL https://localhost:8080
GET / -- Homepage
GET /api/account -- Returns your HuggingFace account info
POST /api/repo -- Create a new repository
```
POST /api/repo json request body
{
    "type": <"model","dataset" or "spaces">
    "name": <repo_name>,
    "private": <true or false>
}
```
DELETE /api/repo -- Delete a repository
```
DELETE /api/repo json request body
{
    "type": <"model","dataset" or "spaces">
    "name": <repo_name>
}
```
PUT /api/repo -- Update repository visibility
```
PUT /api/repo json request body
{
    "type": <"model","dataset" or "spaces">
    "namespace": "<username>/<repo_name>" eg. "ferris/my_repo"
    "private": <true or false>
}
```
ToDos
- Configure GET, POST, DELETE, PUSH routes
- Pass environment variables into Docker per docs
- Debug reqwest x Rust x Docker CA Certificate bug
- Configure Actix logging
- Actix HTTP error response handling
- CI/CD & Binary Release
References
- HuggingFace Hub Python Client
- HF access tokens
- HF Hub REST API Endpoints
- Actix extractors
- reqwest crate docs
- TLS Debugging Docker
Project Repo: https://github.com/athletedecoded/rusty-pipe
![]()
Rusty Pipe [WiP]
E2E ML Pipeline -- from data to distroless deploy
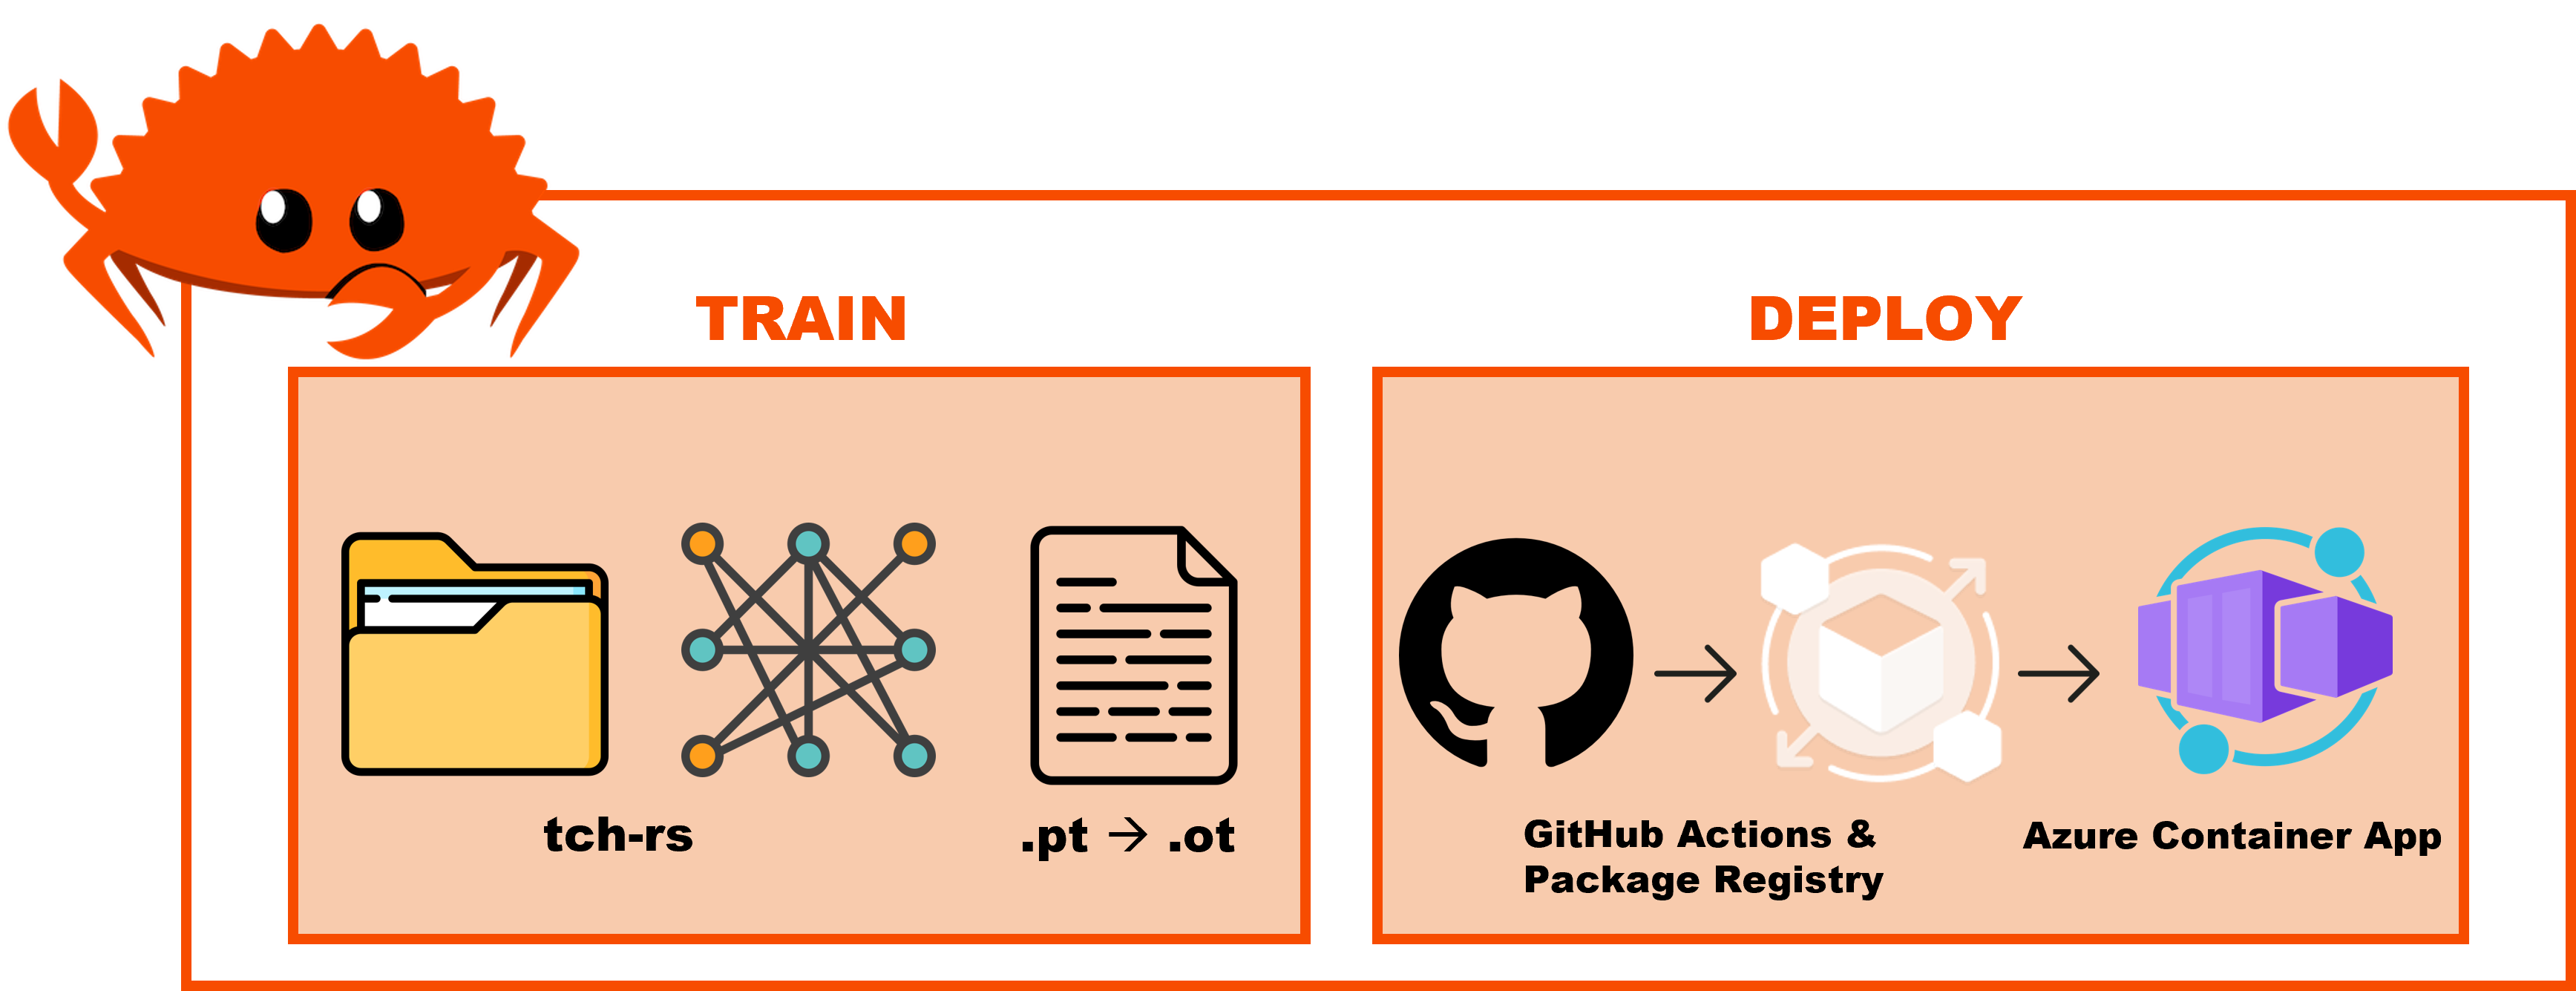
Train
Download example dataset
$ cd train
$ make dataset
Train model
$ cargo run hymenoptera_data
Convert model for Deploy
$ python3 -m venv ~/.venv
$ source ~/.venv/bin/activate
$ pip install -r requirements.txt
$ make models
Deploy
Test Locally
$ cd ../deploy
$ make run
Deploy to Azure Distroless Container
-
Provision Container App
rusty-pipein Azure. Update Container App > Settings > Ingress > Port = 8080. -
From Azure CLI, generate Service Principle Credentials. Capture output and add to Github Repo as
AZURE_CREDENTIALSActions Repository Secret.
az ad sp create-for-rbac --name "RustyPipeAccess" --role contributor --scopes /subscriptions/$AZURE_SUBSCRIPTION_ID --sdk-auth
-
Generate GitHub PAT with write:packages access. Capture output and add to Github Repo as
PATActions Repository Secret. -
Push then manually trigger from GitHub Actions > Trigger Auto Deploy from branch: deploy-distro
git checkout -b deploy-distro
git push origin deploy-distro
Gotchas:
- Rusty-Pipe Repo > Settings > Actions > General > Actions Permissions > Allow all actions
- Rusty-Pipe Repo > Settings > Actions > General > Workflow Permissions > Read & Write
Useage & Endpoints
Local base URL https://localhost:8080
Example deployed URL https://rusty-pipe.livelyisland-7ce892fe.eastus.azurecontainerapps.io/
GET / -- Homepage
POST /predict -- Predict Image
curl -X POST -H "Content-Type: multipart/form-data" -F "image=@assets/ant.jpg" <base_url>/predict
ToDos
Train
- Dataset: create tch dataloader that takes train_val split with class subdirectories
- Models: improve CNN, fix VGG, pass model as CLI param
- Dynamic class generation --> txt file --> deploy
Deploy
- Fix GHA deploy -- upload models to Azure Blob via SDK
- Switch from ot to onnx rt
- Load testing
References
Project Repo: https://github.com/athletedecoded/rusty-ds
CI/CD Data Science with Rust
![]()
CLI and Notebook EDA using polars/plotters/evcxr + CI/CD distroless deployment
"Futureproofs" by testing build across rust releases: stable, beta, nightly
Setup
# Install Rust
make install

# Install evcxr_jupyter
make evcxr

# Check versions
make toolchain
Rust x Jupyter
- Launch
./notebook.ipynb>> Select Kernel >> Jupyter Kernel >> Rust - Run All Cells
CLI EDA Tool
Supported data formats: .csv, .json files
Summary
# If file includes headers
cargo run summary --path </path/to/data> --headers
# ex. cargo run summary --path ./data/sample.csv --headers

# If file doesn't have headers
cargo run summary --path </path/to/data>
# ex. cargo run summary --path ./data/sample.json
Plot

cargo run plot --path </path/to/data> <--headers> --x <col_name> --y <col_name>
# ex. cargo run plot --path ./data/sample.csv --headers --x fats_g --y calories
# ex. cargo run plot --path ./data/sample.json --x fats_g --y calories
Unit Tests
make test
Files
.devcontainer/-- configures local development container environment.github/workflows/CICD.yml-- triggers CI/CD on git push and pull requestdata/-- sample data files for unit testingsrc/lib.rs-- shared library formain.rsandnotebook.ipynbsrc/main.rs-- rusty-ds CLI scriptcargo.toml-- cargo dependenciesnotebook.ipynb-- Rust x Jupyter using EvCxR kernelMakefile-- build commands and utilities
CI/CD
On git push/pull request the CI/CD flow is triggered using Github Actions:
- Install and validate Rust toolchain for each of stable/beta/nightly release
- Format and lint code
- Run unit tests
- Build binary release
- Lint Dockerfile
- Build distroless rusty-ds image
- Push image to Github Container Registry
NB: To build and push to GHCR, uncomment section in .github/workflows/CICD.yml
ToDos
- Add error handling for column name DNE
- Add dynamic plot bounds
Resources
Project Repo: https://github.com/nogibjj/candle-cookbook
Candle Cookbook
![]()
Cooking live @ https://nogibjj.github.io/candle-cookbook/
🚀 Our Mission:
Democratize access to state of the art AI models.
⭐ Our Principles:
🫱🏾🫲🏼 Trust ~ ethically sourced data and end-to-end transparency.
🔒 Privacy ~ secure, on-device inference without data sharing.
🌏 Sustainability ~ optimize efficiency to minimize our carbon footprint.
🛣️ Roadmap
Our goal is to document each stage of a fully transparent LLM development cycle
- Publish MVP Candle Cookbook
- Ethically source and construct an openly available LLM dataset
- Build a Candle-based LLM from scratch
- Customize LLM with finetuning
- CI/CD deployment of LLM
🕯️Start Here
Welcome! Get familiar with Candle Cookbook by going through some of our favourite introductory tutorials
We also recommend getting familiar with the Official Candle framework and User Guide
🌱 Contributing
We welcome contributions from anyone who aligns with Our Mission and Our Principles.
To get started as a contributor:
- Read our Code of Conduct
- Read the Contributor Guidelines
- Install Candle Cookbook according to the Developer Setup guide
🧑🍳 Our Team:
Get to know our Community Leaders
Project Repo: https://github.com/athletedecoded/aws-candle
![]()
![]()
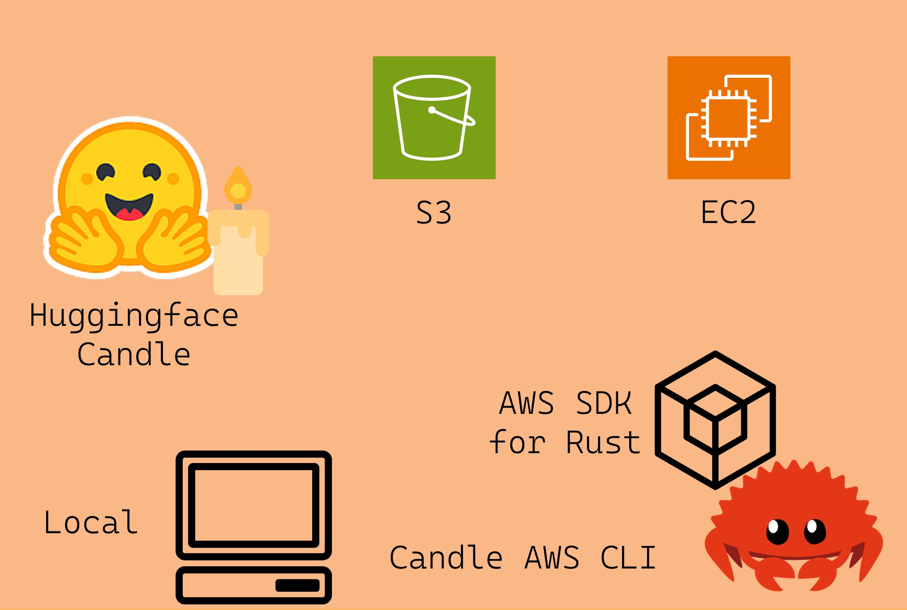
AWS Candle CLI Tool
A Rust CLI tool to support Candle Cookbook on AWS built using the AWS SDK for Rust
Jump to:
Setup
-
Configure an EC2 instance depending on your model target and memory requirements. For a GPU Deep Learning enabled instance follow the Hello, Candle on AWS! tutorial
-
Create an AWS IAM User Policy "Candle-Cli" with
AmazonS3FullAccessandAmazonEC2FullAccesspermissions -
Create an access key for your "Candle-Cli" user
-
Create
.envfile and configure with AWS credentials and EC2 Key Pair
# $touch .env
AWS_ACCESS_KEY_ID=<YOUR_ACCESS_KEY>
AWS_SECRET_ACCESS_KEY=<YOUR_ACCESS_SECRET>
AWS_DEFAULT_REGION=<YOUR_AWS_REGION>
EC2_KEY=PATH/TO/EC2_KEY_PAIR.pem
CLI Commands
List Resources
Args:
- --s3 ~ flag to list s3 resources
- --ec2 ~ flag to list ec2 resources and status
# To list simultaneously
$ cargo run list --s3 --ec2
EC2 Instance Actions
Args:
- --id ~ instance id
- --action:
- start: start instance
- stop: stop instance
- endpoint: get public endpoint
$ cargo run instance --id <INSTANCE_ID> --action <start|stop|endpoint>
SSH Connect to EC2 Instance
Quick Tip: first run cargo run list --ec2 to confirm instance is running!
Args:
- --id ~ instance id
- --mnt ~ mount local model directory to EC2 on launch
$ cargo run connect --id <INSTANCE_ID>

# To remove mount dir to free up memory
ubuntu@ip$ rm -r <MNT_DIR>

# To close SSH tunnel
ubuntu@ip$ exit

# Make sure to stop your EC2 instance to avoid charges
$ cargo run instance --id <INSTANCE_ID> --action stop
S3 Bucket Actions
Args:
- --name ~ bucket name
- --action:
- list: list objects in the bucket
- create: create new bucket with name --name
- delete: delete bucket with name --name
$ cargo run bucket --name <BUCKET_NAME> --action <list|create|delete>
S3 Object Actions
Args
- --bucket ~ bucket name -- NB: Will create bucket if DNE
- --key ~ object key or path/to/file for --action upload
- --action:
- upload: upload local file as bucket object
- delete: delete object with key --key
- get: download object with key --key to ./root
$ cargo run object --bucket <bucket_name> --key <object_key> --action <upload|delete|get>"
# ex: cargo run object --bucket my-bucket --key ./test/test.png --action upload
# ex: cargo run object --bucket my-bucket --key test.png --action get
Model Sources
The AWS Candle CLI is intended to support multiple workflows for building and executing Candle binaries.
Note: The first execution of a binary may take a while to run as the files have to be collected. Subsequent runs should execute much faster.
- Build and run binaries on EC2
- Mount local binary directory to EC2
- Copy your S3 model objects to EC2
- Download prebuilt model binaries
Build and run binaries on EC2
- Complete the Hello, Candle on AWS or CodePipeline + Jenkins tutorials to build binaries on your EC2 instance.
Note: You can replace skip the "Connect to EC2 via SSH" step and connect through the CLI tool instead!
# List your EC2 instances
$ cargo run list --ec2

# Connect to EC2
$ cargo run instance --id <INSTANCE_ID> --action start
$ cargo run connect --id <INSTANCE_ID>

# Complete https://nogibjj.github.io/candle-cookbook/aws/hello-aws.html tutorial
# Remember to skip the "Connect to EC2 via SSH" step

# Instantly run models from the remote EC2 terminal
ubuntu@ip$ ./quantized --prompt "who invented the lightbulb"

# Exit the SSH
ubuntu@ip$ exit

# Stop your instance
cargo run instance --id <INSTANCE_ID> --action stop
Mount local binary directory to EC2
You can mount a local directory of model binaries when you connect to your EC2 instance with the --mnt flag
# List your EC2 instances
$ cargo run list --ec2

# Connect to your EC2 instance + mount local model directory
$ cargo run connect --id <INSTANCE_ID> --mnt <PATH/TO/MNT_DIR>

# To remove mount dir to free up memory
ubuntu@ip$ rm -r <MNT_DIR>

# Exit SSH
ubuntu@ip$ exit

# Stop your instance
cargo run instance --id <INSTANCE_ID> --action stop
Note: You can build Candle binaries locally by following the Hello, Candle! tutorial.
Copy your S3 models to EC2
If you have Candle binaries stored as S3 objects or artifacts -- like if you completed the Hello, Candle on AWS! -- then you can copy them across to your EC2 instance.
Note: Ensure your EC2 is configured with IAM User Role with AmazonFullS3Access like in Hello, Candle on AWS!
# List your S3 buckets and EC2 instances
$ cargo run list --s3 --ec2

# List your S3 objects
$ cargo run bucket --name <BUCKET_NAME> --action list

# Connect to EC2
$ cargo run instance --id <INSTANCE_ID> --action start
$ cargo run connect --id <INSTANCE_ID>

# Check AWS CLI is installed
ubuntu@ip$ aws --version

# If not install AWS CLI
ubuntu@ip$ curl "https://awscli.amazonaws.com/awscli-exe-linux-x86_64.zip" -o "awscliv2.zip"
ubuntu@ip$ unzip awscliv2.zip
ubuntu@ip$ sudo ./aws/install
ubuntu@ip$ rm -r awscliv2.zip

# Check install
ubuntu@ip$ aws --version

# Copy individual models from S3 to EC2
ubuntu@ip$ aws s3 cp s3://MY_BUCKET/model .

# Copy the entire bucket of model objects/artifacts from S3 to EC2
ubuntu@ip$ aws s3 sync s3://MY_BUCKET .

# Exit the SSH
ubuntu@ip$ exit

# Stop your instance
cargo run instance --id <INSTANCE_ID> --action stop
Download prebuilt binaries
Once connected to EC2 you can download run any of the prebuilt binaries available here. Make sure to run chmod +x to give EC2 execution permissions!
wget -O mistral-cudnn https://github.com/athletedecoded/cookbook-binaries/raw/main/binaries/cudnn/mistral?download=
chmod +x mistral-cudnn
./mistral-cudnn --prompt "who invented the lightbulb"
AWS Candle CLI Binary
Build Executable Locally
$ make release
Run AWS Candle CLI Locally
$ cd target/release
$ ./aws-candle <COMMANDS>